Streamline Payments are available on our Community Pro and Operations Pro packages.
Streamline Payments is an integrated, easy-to-use payments tool made just for you. This Getting Started guide will walk you through the entire process of getting this tool set up on your Streamline site.
Note: We have partnered with Stripe to help in the transaction processing for this new tool, and using Streamline Payments requires setting up a Stripe account for yourself and your district. This process will take around 5 minutes to complete (if you have the below items ready!), and should be completed by (or in consultation with) the administrative head of your district or agency.
Be prepared with the following materials before beginning:
- a mobile number to secure your personal Stripe account (this can be your personal cell as it will only be used to log in to your personal Stipe account)
- district contact information, including your EIN (Employer Identification Number)
- contact information for a "designated representative" (someone with significant responsibility who can act on behalf of the district), including their date of birth
- a short description of the products or services you'll be offering
- banking information such as routing and account numbers
Activating your Stripe account
To activate your Stripe account, head to the Payments tab and click on Activate.
This will launch into the Stripe website where you can complete the account set up.
Once the Stripe integration is complete, you're ready to begin adding products!
Adding products
Products are designed in Streamline Payments in a familiar way: they are just another type of Page you can add to your site, but they include some special features that make them unique like quantity and pricing information, plus a whole lot more.
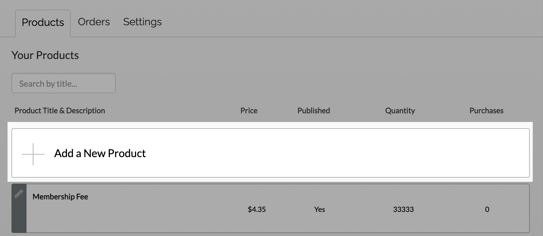
To add a product to your site, navigate to the Payments tab (via the red Admin toolbar) and click on the "Add a New Product" button:
That will bring up the page creator for your Product page. Here, you can choose all of the important details for your product, such as price, description, quantity, details to collect, and more, in six steps:
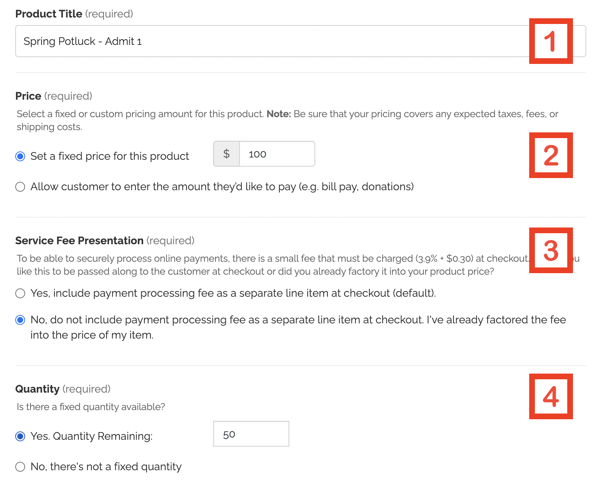
( Step 1 ) To begin, give your product page a title. This should quickly describe the service, fee, product, or donation you're featuring on this page.
( Step 2 ) Next, give your product a price. Alternatively, you can allow your buyer to choose their own amount, in the case of donations or ad hoc bill pay.
( Step 3 ) You have the option of presenting the payment fee (currently 3.9% + $0.30) for the buyer to pay, or you can choose to factor the fee into your price. In the first case, you will receive the full amount charged and the customer will pay the additional fee on top of that. In the second case, you will receive the amount paid minus the fee.
(Step 4) You can elect to define a fixed quantity for your product or service which will set a limit on the number of purchases on that product; or, in cases such as fees or bill payment, choose no fixed quantity instead.
Let's continue to scroll down the page editor...
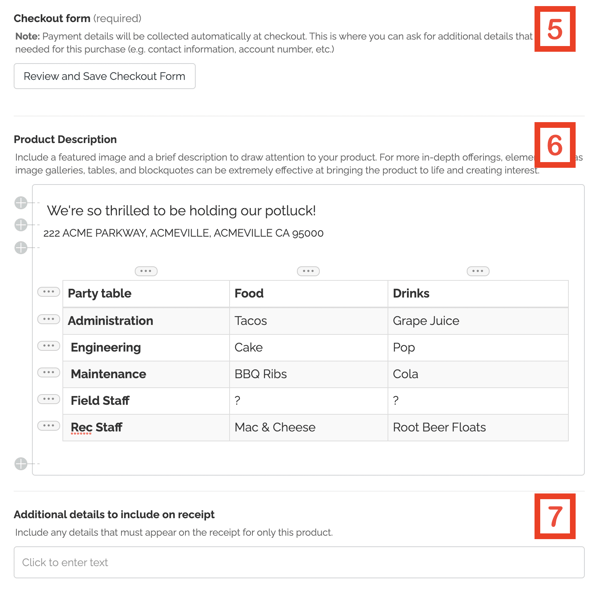
( Step 5 ) You can add content such as text descriptions and images of your product/service in the Product Description section, which is essentially identical to the Main Content section from other page types; that means you can format text and add elements (like images and files) in this area the same as you would on any other page on your site!
( Step 6 ) The checkout form will appear on the page after the visitor clicks on the "Buy Now" button on your Product page, prior to the user entering their payment information. This form can collect any additional details you'll want for your product, service, or donation, in addition to the payment details that will be collected later.
This form works very much like every other form on your site, so if you already know how to create and manage web forms you'll be right at home.
However... If you aren't familiar with how to create and manage forms on your Streamline site, this is a great time to learn! We recommend reading through this tutorial on creating forms!
( Step 7 ) Here you can include any other details you'll want to include on the customer receipt for this product, as well as preview the receipt in a new window.
When finished with all six steps, you can Save and close your Product page!
Reviewing your product
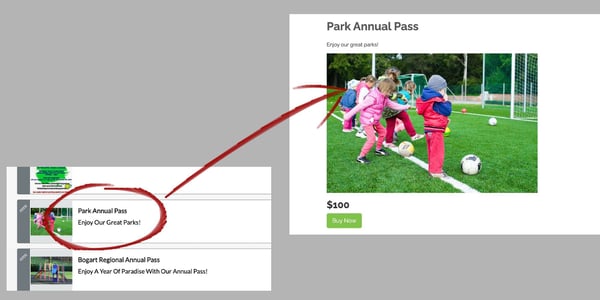
Once done, it's a good idea to review your product page to make sure everything is looking OK. After saving you should see your page appear in the list of all your Products on the Products tab; click on the title of the page to see it in action:
Once on your product page you can click on the green "Buy Now" button:  to review the form you created in Step 6 above. If you need to make any changes, you can click the "Edit" button at the top of the screen.
Displaying products on your site
For any additional products or services you want to include on your web site, repeat the steps above until you have the product pages you need to continue. Once you have your product pages ready, you can begin organizing them on your site so they're easy for the public to find.
The good news is, product pages are like any other page on your site. So if you already know how to add a page to your navigation menu, if you know how to tease a page on your home page, or if you know how to create folder-like pages called "landing pages", then you already know how to organize product pages on your site!
Here are some ideas for common use cases in case you're looking for inspiration:
Add a donation link to your menu / homepage >
Add bill pay to your quicklinks zone > (coming soon)
Group products together on a landing page > (coming soon)
Managing purchases
Once you have product pages created and organized on the site, you can expect orders to start coming in. You can go into the Orders tab (Payments > Orders) to view, manage, and even export order data. If you have experience managing form submissions generally, this should be familiar!

Viewing and filtering orders
You can filter your orders in a variety of ways. The fastest ways are often to search (A) or sort by the product page (B). You can also sort by the status (C) of the order or who it's assigned to (D), both of which can be updated or changed via the View / Edit button for that order (H).
Note: you can search by Payment ID, payment date, and amount, in addition to any of the data included in the Order Details section!
If you want to see more data on this screen you can do so by clicking on Show More (G). You can also see the specific product page by clicking on the Product name (F).
Once you have set up a filter for a specific Product (B) you'll be able to download a CSV file (aka simple spreadsheet that opens in Excel) for that order data (E).
Managing orders & refunds
To manage a specific order, click the View / Edit button (H) to bring up the Manage Order screen, where you can view all of the information submitted in the checkout form and any history associated with this order:

From this screen, you can easily refund a payment, update the status, reassigned, or add an internal note to the order.
Note: every order has a default status of "Paid" but can be updated to Refunded, Completed, or Archived.