Overview
Web forms are excellent ways to reduce your paper consumption and more efficiently process applications, requests, and virtually anything that a paper or PDF form would accomplish. They're even a step ahead of fillable PDF forms, because even fillable PDFs have to be downloaded in order to be edited and saved.
Web form submissions are also easily managed in Streamline, or exported as a spreadsheet for further analysis.
Starting with a paper or PDF form
Generally speaking, you'll already have a form in place in either paper or PDF format. You'll use this "static" form as a guide for creating your web form. If you're creating a form from scratch, we recommend doing a quick list of the types of data you want to collect in your form before you begin.
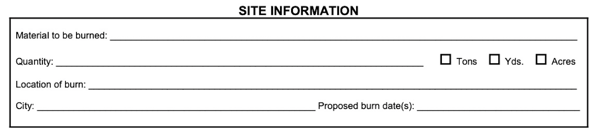
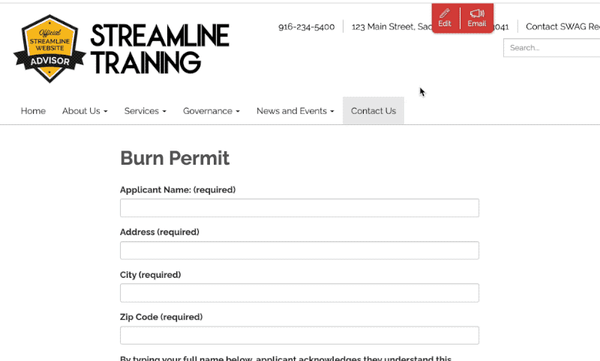
We'll work with the following form for this tutorial, a generic burn permit request form:
-jpg.jpeg)
Understanding form fields
Fundamentally, every form is a collection of fields that need to be filled out. Streamline forms aren't any different, so it's important to understand the specific types of form fields you can create.
There are several field types you can select for each field you add to your form. We'll use a couple of different types of fields in this form. For more details on what each field is. View more about field types here.
Textfield: the most basic field type. Perfect for single lines of text, such as a name, street address, amount, or a simple open-ended response
Email: just like the Textfield, but will validate the submission to make sure the user entered a valid email
Textarea: a large text box that allows for multiple lines of text and can be resized by the submitter. Perfect for longer open-ended responses that provide context or just need more room for explanation
Checkboxes/radio: a configurable field type that allows for selecting multiple choice items in the form. Perfect if you need for someone to select from a list of options all of which are visible on the page.
You can choose to allow for multiple selection (checkboxes) or for only one selection (radio) depending on your needs.
Dropdown: a configurable field type that is typically used for individual selections from a dropdown list, but can be configured to allow for multiple choice selections as well.
File Upload: allows the submitter to upload a file from their computer or mobile device directly to the form
Creating forms and form fields
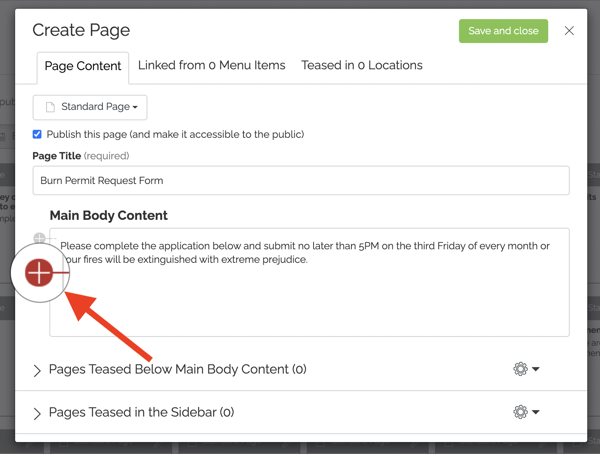
First things first, we need to create or navigate to the page where our new web form will live. Let's go to the Content tab and click on the Add New button to bring up the page creator. Go ahead and add a title or any other text as needed; when ready, you can add your form by clicking a + icon to the left of the content area:
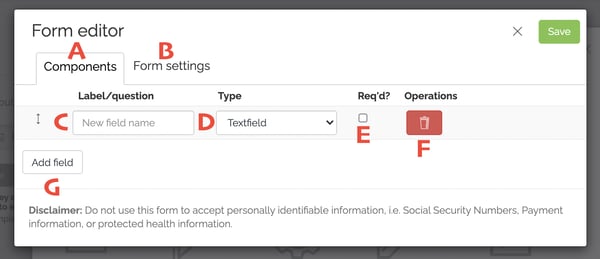
From the element menu that pops up, choose the Form option and click insert. That will bring up the form editor as seen here:
A - Components tab: where you'll add and update form fields
B - Form settings tab: where you can set up notifications and assignments for this form
C - Field label: the prompt for the field
D - Field type: the type of field (more information about form field types)
E - Required checkbox: determines if field is required for the form to be submitted
F - Delete field: removes the field from the form
G - Add Field: adds a new field to the form
You can add more fields to this form and give yourself some room to work with by clicking on the Add field (G) button.
Getting started
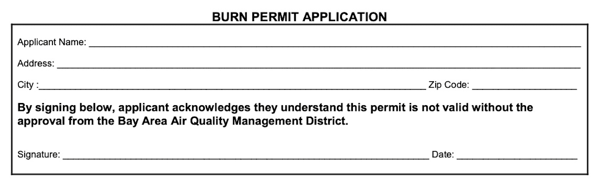
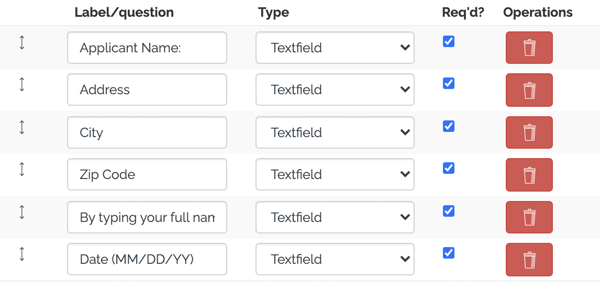
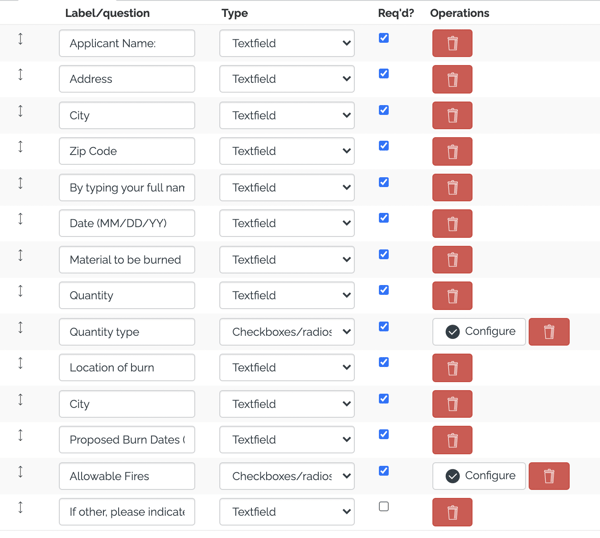
We'll begin with the first section by creating the first four fields of the burn permit application, Applicant Name, Address, City and Zip Code:
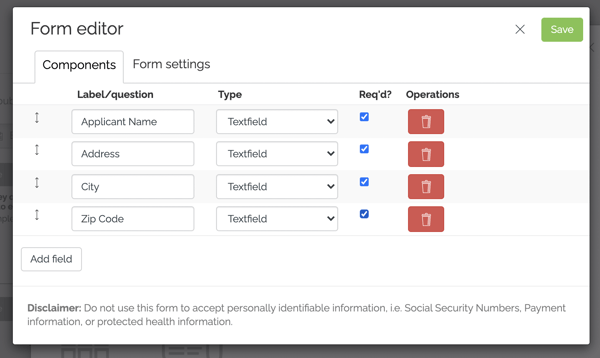
Note that the labels for each question are adapted directly from the original form. We've chosen Textfield as the type for each as none of them require more than a line of text to submit.
Now our form editor looks like this:
Note: for date fields, we recommend including the required format in the label to help standardize your data!
Completing each section
In order to finish adding your form, you only need to go through each section and add a field for each question. With the first section done, let's take a look at the next section labeled "Site Information":
With the first question in this section, we'll use a field we haven't used yet: the text area field so that the person can include as much information about what is to be burned as they can.
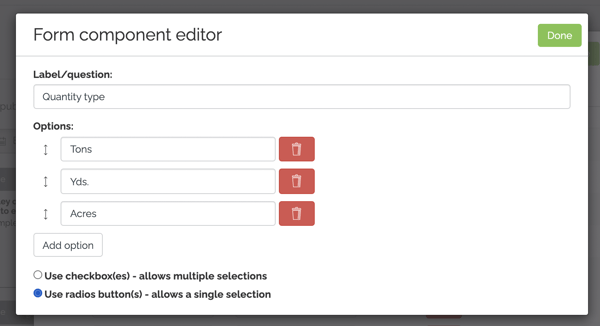
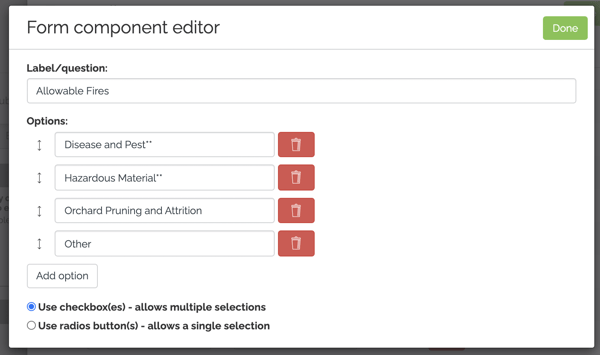
For quantity, we'll create a text field, but then follow that up with a checkbox field for the tons / yards / acres selection that we'll call "Quantity type". When you select options with multiple choices, you'll be able to configure them like so:

This will allow you to configure each option which for our purposes are Tons / Yds / Acres. Since the quantity can't be more than one at the same time, we'll configure this field to be a radio-type selection:
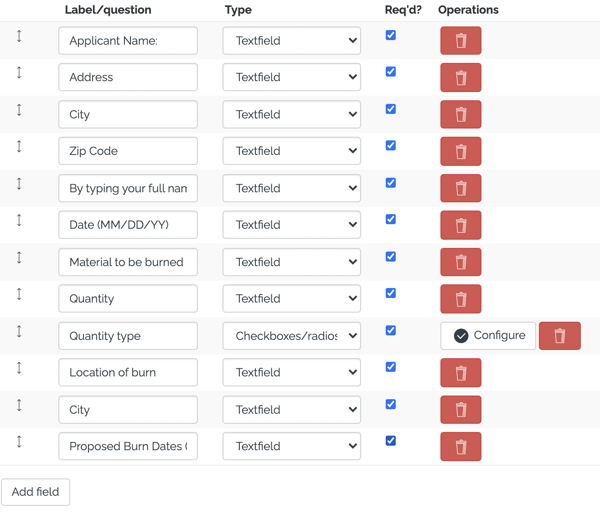
We can go ahead and add the remaining fields from this section as simple text fields. Our form editor now looks like this:
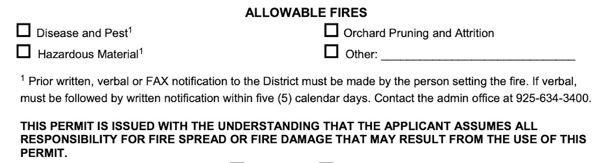
The final section
We only have one section left that asks the user to select from multiple options:
To implement this section, we're going to create two fields: the first a checkbox/radio selection field that allows for multiple items to be selected, with the following configuration - note that the "checkboxes" option is selected to allow for multiple entry:
Note also that we replaced the superscript number 1 with a pair of ** that we'll pair with a similar call out on the page where this form lives -- more on that later!
Next on the form, we'll need an optional "Other" field to collect more information if that option is chosen. That can be a simple text field so that this ends up looking like so:

Reviewing our work
At this point each field from the original form has been adapted to this Streamline form. Our form editor now looks like this:
We have some additional text on the original form that needs to be adapted as well; generally speaking, if the text isn't a direct apart of a question it can be included as formatted text on the page that you'll add outside the form. This could look something like this:
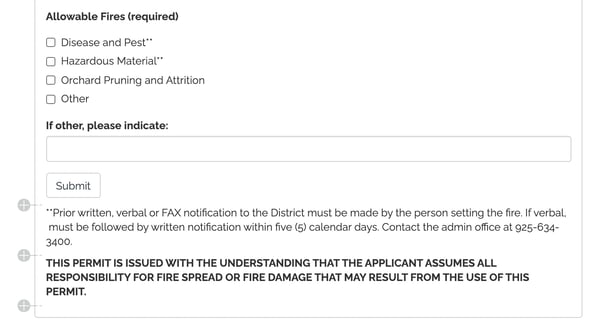
Note: After the form we've added some text on the page which compliments the form itself and includes more information.
Managing submissions & notifications
There is one last section of the form we've neglected thus far. This area is for the office staff to use in processing. For Streamline forms, that is something done through the Form Submissions tab of the Streamline platform -- users with a log in will be able to receive submission assignments, update the stage of a submission, add notes, and reassign them to other users.
Updating form submission settings
To update the assignment and notification settings for any form, make sure you're editing the page the form is on and click on it:
From the form editor you can click into the Form settings tab and be able to assign new form submissions to a user as well as include others on any notifications sent from this form like so:
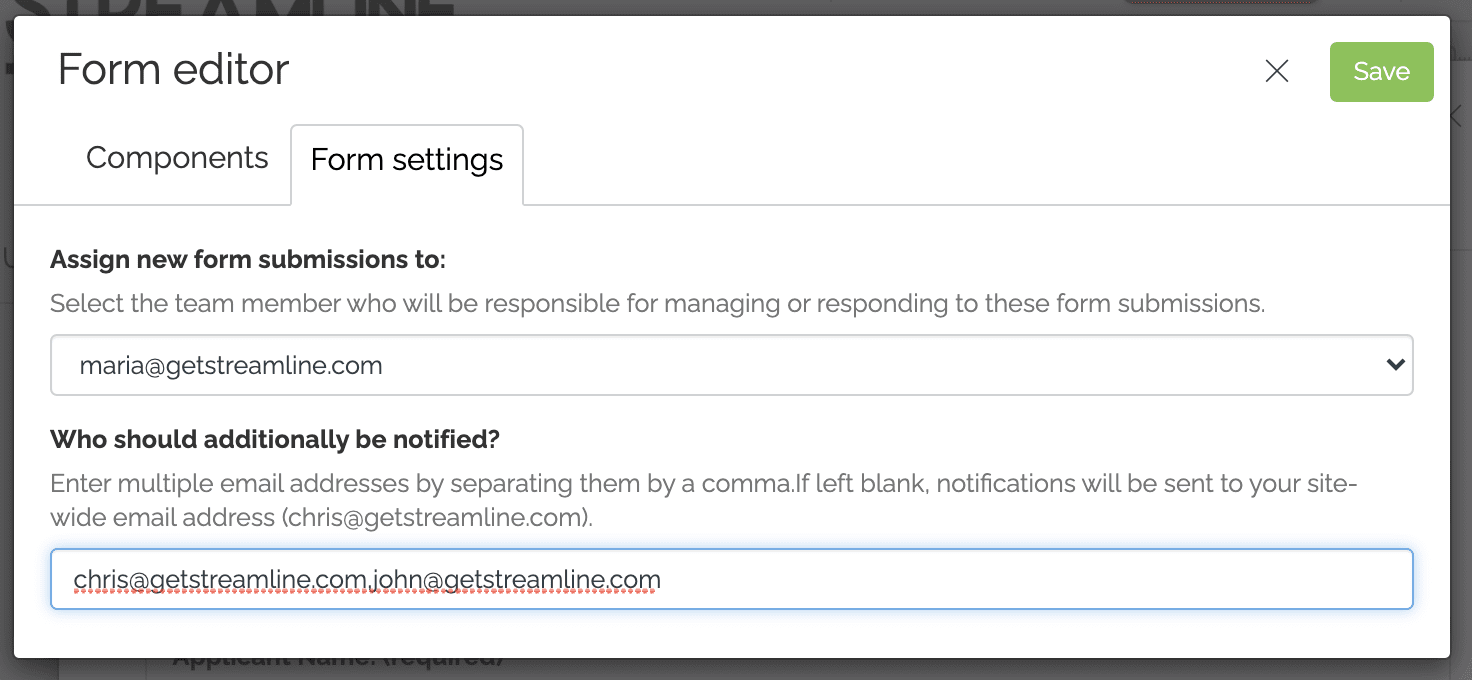
Note: users must have a login to your Streamline site in order to be assigned new submissions. Prior submissions to this form will not be automatically assigned.
Note: additional emails should be included in the field separated only by a comma (no spaces)