Jump to:
Add a teaser to a page
Customize a teaser
Reorder teasers within a teaser zone
Display (or hide) subteasers in a teaser zone
Remove a teaser from a page
Follow along
Last updated: November 2024
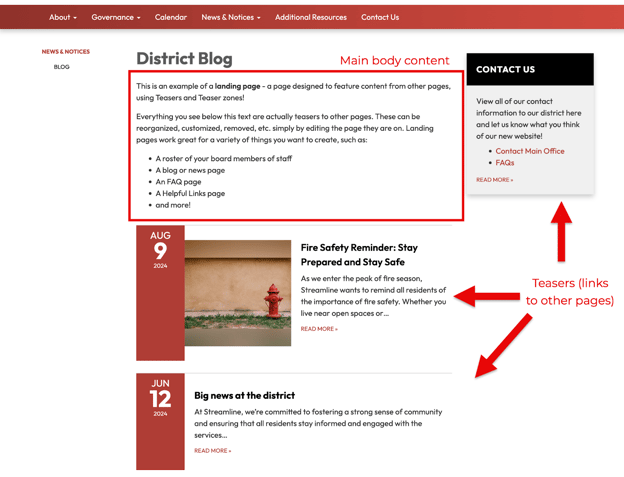
Teasers are powerful ways to improve any Streamline page by displaying and linking to other relevant content, which can be hosted on your site or anywhere on the Internet. You can think of teasers as links that look like "mini" versions of the page they link to. They can be easily customized in a variety of ways: here is an example of a Standard Page with several teasers displayed that link out to other pages on the site:
Teasers can be added to teaser zones, which can be found on any page, including the home page. Learn more about teaser zones >
Add a teaser to a page
- Navigate to the page and click Edit this page at the top right of the screen:

- Locate the zone where you want to add the teaser, and click on the title of the zone to expand it
- Click the +Add New button
- Locate the page you want to tease by either searching or scrolling through the content library. If you haven't created the page you want to tease, you can do so now by clicking on the +New button from this screen.
- Once you have selected or created the page you want to tease, it should appear in the teaser zone. Click the Save and close button in the top-right corner of the edit screen to finalize your changes:

Customize a teaser
- While editing a page, locate the teaser you want to edit by expanding the teaser zone where it lives by clicking on the title of the teaser zone
- Locate the pencil icon in the upper right corner of the teaser and click it:

- Depending on the teaser, you may see a couple of different options:
- If the teaser has never been customized, you will see an option to Edit the original page and another option to Customize this teaser. Choose the Customize this teaser option to edit the appearance of this teaser
- If the teaser has been customized before, it's possible that multiple "instances" of the teaser exist. You can choose to Customize all instances of this teaser, or you can choose to Customize only this instance of this teaser. Choose whichever is appropriate for your task

- On the Edit teaser screen, you can customize every part of the teaser's appearance without modifying the original page:
- To modify the image displayed on this teaser, click the blue Customize link above the thumbnail. You can now either click the thumbnail to choose an image from your content library, or you can drag and drop a photo from your hard drive
- To modify the title of your teaser, click the blue Customize link above the Title field and type in your new title
- To modify the summary text of your teaser, click the blue Customize link above the summary field and type in your new summary
- To modify the call to action text of your teaser, click the blue Customize link above the call to action field and type in your new call to action

- When finished customizing your teaser, click the Save button in the top right of the Edit teaser screen:
Reorder teasers within a teaser zone
- While editing a page, you can determine the order of how teasers appear in one of two ways:
- If you want to automatically order the teasers in this zone (i.e. by alphabetical or reverse chronological order):
- Click on the gear icon next to the teaser zone you want to organize:

- Choose the type of ordering you would like under the Order section - the teasers should automatically reorganize themselves
- Click on the gear icon next to the teaser zone you want to organize:
- If you want to manually choose the order of the teasers:
- Locate the "handlebars" in the top left corner of each teaser (they appear as 3 vertical dots):

- Click and hold the handlebars to drag the teasers into the order you want
- Locate the "handlebars" in the top left corner of each teaser (they appear as 3 vertical dots):
- If you want to automatically order the teasers in this zone (i.e. by alphabetical or reverse chronological order):
- When you're finished reordering the teasers, click the Save and close button to save your changes:

Display (or hide) subteasers in a teaser zone
- While editing a page, click on the gear icon next to the teaser zone where you want to display subteasers:
- By default, subteasers are hidden. You can choose to display the substeasers in this zone either as a list or as thumbnails by choosing your preferred option under the Subteasers section
- The subteasers will automatically appear in your chosen format when you click Save and close:
- Likewise, if you later decide you want to hide these subteasers, you can choose the "Hide subteasers" option instead
Remove a teaser from a page
- While editing a page, locate the teaser you want to edit by expanding the teaser zone where it lives by clicking on the title of the teaser zone
- Locate the pencil icon in the upper right corner of the teaser and click it:
- Click the red Remove this teaser button:

- When you're finished, click the Save and close button to save your changes:
Follow along with these step-by-step instructions