Last updated: September 2025
To manage your Contacts, head to the Engage tab, then select the Contacts tab (Admin bar > Engage > Contacts)
Add a single contact to Engage
- In your red admin toolbar, navigate to the Engage tab.
- At the top, click the Contacts tab.
- Click the green Add a contact button.
- Enter the email address in the Email address field.
- Under Subscribe to list, check the boxes for the lists you’d like this contact to be subscribed to.
- Repeat step 2 above (go to the Contacts tab).
- Use the filters to locate the contact in a specific Engage list.
- Click the Edit button next to the contact.
- Under Subscribe to list, check or uncheck the boxes to subscribe or unsubscribe the contact from the lists.
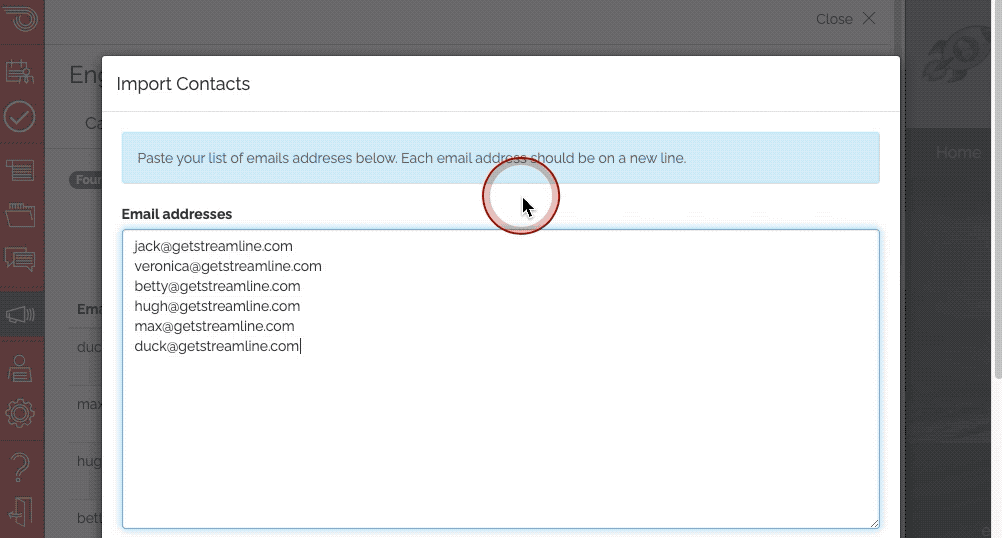
Importing an existing batch of emails into Engage.
- Head to the Engage tab, then select the Contacts tab (Admin bar > Engage > Contacts):
- Click the green Import Contacts button and copy / paste your emails into the Email Addresses field, with each email separated by a line break:

- Under Subscribe to list, check the boxes for the lists you’d like to bulk subscribe these contacts to and click the Import Contacts button:
Editing a Contact
- In your red admin toolbar, navigate to the Engage tab.
- At the top, click the Contacts tab.
- Each contact has a row with the following information: Email, Status, the lists they are subscribed to, the date they were added on and an Edit and Delete Button
- Click on edit to modify the contact's email address or to update the lists they are subscribed to.
Deleting a Contact
- In your red admin toolbar, navigate to the Engage tab.
- At the top, click the Contacts tab.
- Use the filters to locate contacts in a specific Engage list.
- Click the Delete button next to a contact to remove them from the list.
Other troubleshooting items
Don't see a subscriber that you know was added? Check their status
- In your red admin toolbar, navigate to the Engage tab.
- At the top, click the Contacts tab.
- On the top right-hand side, you will see the following: Search by email and Status drop-down
- Type the email into the search box and select the "All Status" option.
Subscriber Statuses
When searching for a contact, you can filter by status. The available options are:
-
All Statuses
Shows contacts in every status category. -
Pending Verification
The contact has been added but has not yet confirmed their subscription (usually through a verification email). -
Active
The contact is verified and currently subscribed. They are eligible to receive emails. -
Deleted
The contact record has been removed from the system. -
Failed Verification
The contact attempted to verify their subscription but the process was unsuccessful (for example, invalid or expired verification link). -
Unsubscribed
The contact chose to opt out of receiving future emails. -
Bounced
Emails to this address could not be delivered (e.g., invalid email address, mailbox full, or domain issues). -
Complained
The contact marked a previous email as spam or reported it as unwanted.
-
⚠️ Important:
If an email address is marked as Bounced, Failed Verification, Unsubscribed, or Complained, they cannot be added back. This restriction helps protect your overall email delivery rate.