Last updated: December 2025
Image Banner Overview
The Image Banner Designer Section allows you to add a large, visually engaging banner image to your page. Image Banners are ideal for highlighting announcements, promotions, or key messages while maintaining a clean, modern layout.
This article walks through how to add an Image Banner, choose a layout style, and customize the appearance.
Add an Image Banner to a Page
-
Go to your Amplify page where you want to add the section.
-
Click any blue + icon where you want to add a Designer Section.
-
Select Image Banner, then click Apply.
Choose an Image Banner Layout
Image Banners include multiple layout styles that control how the image and text are displayed.
-
Click Change Layout.
-
Select the layout style you want.
-
Click Apply.
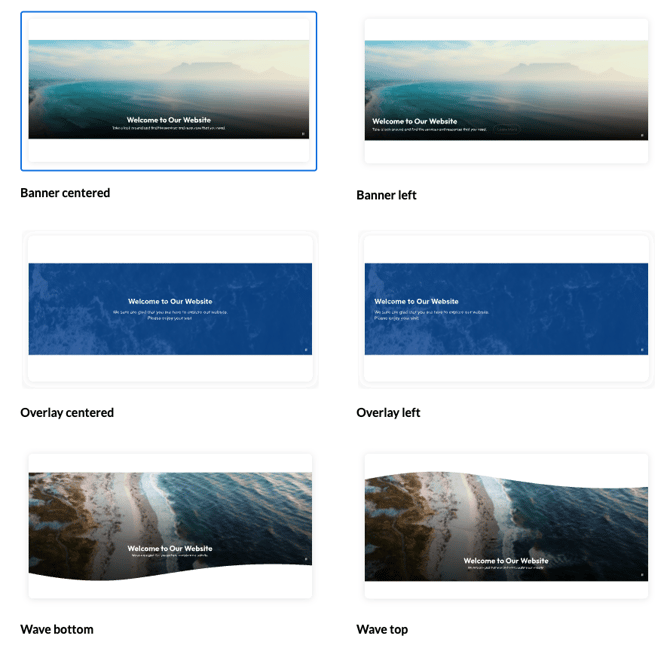
Available Image Styles
- Banner Centered
Displays the image with centered text over the banner. This is a great all-purpose option for headlines or announcements. - Banner Left
Positions the banner text to the left, creating a more editorial-style layout. - Overlay Centered
Places text directly over the image and centers it for a bold, focused message. - Overlay Left
Displays overlay text aligned to the left while keeping it layered over the image. - Wave Bottom
Adds a decorative wave shape to the bottom of the image banner for a softer transition into page content. - Wave Top
Displays the wave at the top of the banner, helping visually separate it from content above.
Add an Image
-
Click Add Image.
-
Choose an image that’s already uploaded, or upload a new image from your computer.
-
Save your selection to apply it to the banner.
Recommended image sizes
- Image banners: 1800x500 - 2000x800
- It can be taller vertically, but it will take up more space on the screen.
Add the Title and Subtitle
Before saving the Image Banner, you must add text content.
-
Enter a Title for the banner.
-
Enter a Subtitle to provide additional context or supporting information.
Optional: Link a Page and Add Button Text
If you want the Image Banner to link to another page:
-
Click Add Page.
-
Select the page you want to link to and save.
-
Enter Button Text so users know where the banner will take them.
Button Text is required when a page is linked.
Customize the Appearance
You can adjust the look and feel of the Image Banner using the Edit Section settings.
Section Colors
-
Adjust the Section Color to control overlay and text contrast.
-
Try different colors to ensure readability over your selected image.
Add a Background Image
-
The selected image serves as the banner background.
-
You can replace or remove the image at any time.
Add Padding
-
Enable Add Padding to increase spacing around the banner content.
-
Padding helps improve readability and visual balance.
Optional Layout and Style Settings
Depending on the layout selected, additional appearance options may be available. Use the Additional Layout Options tab to preview and adjust these settings as needed.
Save and Preview
When you’re finished configuring the Image Banner, click Save to publish and preview it on your page.
Image Banners are a powerful way to create visual impact while guiding users to important content.
Step-by-Step Walkthrough
Use the step-by-step Scribe walkthrough to follow along while adding and configuring an Image Banner in Amplify.