Last updated: December 2025
Forms Overview
The Forms Designer Section allows you to add a customizable web form directly to your Amplify page. Forms can be used to collect general inquiries, feedback, requests, or other non-sensitive information from visitors.
Do not use webforms to collect sensitive information
This article walks through how to add a Form section, choose a layout, customize form fields, and configure form settings.
Add a Form to a Page
-
Go to your Amplify homepage where you want to add the form.
-
Click any blue + icon where you want to add a Designer Section.
-
Select Forms, then click Apply.
Choose a Form Layout
When you add a Form section, you must choose a layout for how the form appears on the page.
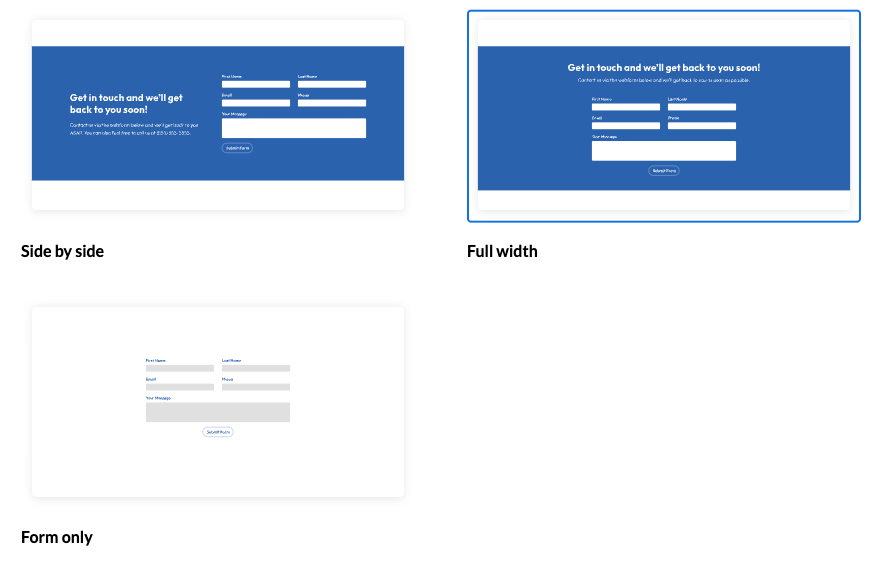
Available Layout Options
- Side by Side
Displays the form alongside text content, such as a title and description. - Full Width
Displays the form across the full width of the section for a more prominent layout. - Form Only
Displays only the form fields without additional content.
You can change the layout at any time by selecting Change Layout.
Customize the Form Section
After adding the form to the page, you can customize how the section appears.
Display as Accordion
You can enable Display as Accordion to collapse the form into an expandable section.
-
Enter an Accordion Title to label the form.
-
Choose an Accordion Color to match your site’s branding.
-
Visitors can expand or collapse the form by clicking the accordion title.
Add a Title and Subtitle
-
Enter a Title to explain the purpose of the form.
-
Add a Subtitle to provide additional instructions or context.
Section Title Alignment
Control how the title and subtitle appear above the form.
-
Left Aligned
-
Centered
Section Color
-
Choose a Section Color to set the background color behind the form.
-
Select a color that provides good contrast and readability.
Add a Background Image
-
Enable Add a Background Image to place an image behind the form section.
-
You can replace or remove the background image at any time.
Customize the Webform
To configure the actual form fields and behavior, open the Customize Your Webform panel.
Form Fields
Under Form Fields, you can add and manage the fields that appear on the form.
-
Select a Field Type.
-
Enter a Label for the field.
-
Choose a Width (such as Full or Half).
-
Mark the field as Required if needed.
-
Click Add Field to include it on the form.
You can reorder or remove fields as needed.
Important:
Do not use webforms to collect sensitive information.
Form Settings
Under Form Settings, you can configure how form submissions are handled.
Webform Name (hidden)
Used internally to identify the form.
Who is responsible for responding?
Select the individual or role responsible for handling form submissions.
Who should additionally be notified?
Enter one or more email addresses to receive notifications when the form is submitted. Separate multiple emails with commas.
Save and Preview
When you’re finished configuring the Form section and webform settings, click Save to publish and preview the form on your page.
Forms provide a simple, effective way for visitors to contact your organization or submit requests directly through your website.
Step-by-Step Walkthrough
Use the step-by-step Scribe walkthrough to follow along while adding and configuring a Form section in Amplify.